Many, even most, Seagate, Maxtor and Samsung external drives are sold with bundled backup and management software.
However, in some cases it is not possible to use such software. A few examples are:
-
A user has lost or uninstalled their software and needs a temporary (or permanent) means of using the external drive to backup data.
-
A user's bundled backup software is malfunctioning for a period of time.
-
A user prefers to backup data manually.
-
The drive did not include any bundled backup software.
-
The user is using the drive for additional storage and has an alternate method of backing up.
- Older external drive’s bundled software may not be supported in Windows 8, Windows 7 or Vista or a newer version of the MacOS.
Every model of Seagate, Maxtor-brand, and Samsung external drive has a ready-to-use formatting already in place. In Windows, there is no need to do anything special or additional to make the drive work. Simply plug in the power, plug in the USB/Firewire/eSATA cable, and the drive should appear in (My) Computer and Windows Explorer almost immediately.
Once it is detected, all you have to do is move data into it. There are 2 general ways to do this:
(Windows 8 has an additional option called File History. See this Microsoft article for details.)
Here is how to perform those actions on a Windows computer :
Note: If you would prefer a video tutorial of these steps instead, please click the thumbnail below.
Here we will discuss dragging a piece of data from the (My) Documents folder to the external drive. This exercise can be repeated with one file, many files, one folder or many folders.
-
First, open one window by double-clicking on (My) Computer.
-
If the upper right-hand corner of the window that opens includes this symbol (
 ), click it.
It will change to this symbol: .
. -
Now you can resize it. Move your mouse to a corner of the window.
-
Click and hold down the mouse button, on the corner of the window.
-
Move the mouse, still holding down the button, and the window corner will move with your mouse. Resize it so that it only takes up a portion of your screen.
-
Look for the Seagate, Maxtor, or Samsung external drive in (My) Computer. It will be a drive letter, like E: or F: (unless you have changed it). Open (My) Documents by double-clicking on it.
-
Resize the window in the same way, so that each window takes up only a portion of the screen.
-
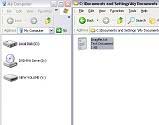
Now you will have two windows. One is the source, one is the destination.
(Click to expand the image.)
-
Click and hold down the mouse button, on the document you want to move. It will illuminate and a "ghost" image will move with your mouse button.
-
Drag the mouse so that the "ghost" image hovers over the icon representing the external drive (in this example, the V: drive).
(Click to expand the image.)
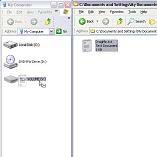
-
Let go of the mouse button and the file will copy automatically to the external drive.
- Double-click on the external drive’s letter.
 Double-clicking sometimes causes Autoplay on our newer drives.
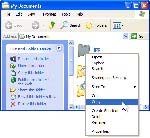
Right-click on the external drive letter and choose Explore. - The contents of the external drive will display on the window.
(Click to expand the image.)

- The task is complete! This is known as a "drag-and-drop" action.
Note: If you would prefer a video tutorial of these steps on Windows 10 instead, please click the thumbnail below.
-
Double-click to open the place where the file you want to copy is located. (My) Documents, for example.
-
Find the file or folder you would like to copy and right-click on it.
-
A drop-down menu will appear. Choose Copy.
(Click to expand the image.)
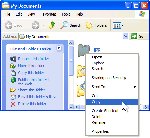
-
The file or folder is now copied and held in the computer's short-term memory.
-
Double-click to open (My) Computer.
-
Look for the Seagate, Maxtor, or Samsung external drive in (My) Computer. It will be a drive letter, like E: or F: (unless you have changed it). Double-click on the external drive.
-
The window will change to a display of the contents of the external drive.
-
On the top bar of the window, choose Edit.
Alternatively, you may right-click on blank space within the window and a drop-down menu will appear. -
The file or folder will appear inside the window. It is copied.
-
The task is complete! This is known as a "copy-and-paste" action.
How to perform these actions on a Mac computer :
Drag and Drop :
- Make sure your drive is formatted for the Mac or that the needed driver has been installed on your computer. As a rule of thumb, drives with the "for Mac" suffix in the drive's name will be already formatted for use with a Mac computer. Examples : Free Agent Go for Mac, Backup Plus Slim Portable Drive for Mac. Other family of drives will be versatile and allow you usage on both a Mac and a PC. The "GoFlex" and "Plus" families are such drives. Examples : Backup Plus Desktop, FreeAgent GoFlex Portable. These drives come preloaded with a little driver you need to install to ensure proper usage with the Mac computer. On such drives, locate the MacInstaller.dmg file on the drive and install it to your computer. This will allow you to transfer data to the drive properly.
- Once the drive is ready for use, make sure you can locate it on your computer's desktop.
- Once you can see the drive, open up a Finder window and navigate to where you have the data you wish to drag and drop. If the Finder window opens on top of the drive's icon, move the Finder window around so you can see both your data inside the Finder window, as well as the drive's icon on the desktop.
- Navigate to where the file/folder you wish to move over to your drive is located at. For example, if you are trying to copy some documents, then you would go under Favourites in Finder, and then Documents.
- Left-click and hold the file/folder you wish to move to your drive. While still holding the button, slide your mouse so the cursor points over the Seagate drive. Let go of the mouse button to have the file/folder to move inside the drive. Note : If you hold the button while having the cursor over the Seagate drive, the drive's window will open after a few seconds. This is useful in case you want to put the file/folder into a specific folder already located on the drive.
Copy and Paste :
- Make sure your drive is formatted for the Mac or that the needed driver has been installed on your computer. As a rule of thumb, drives with the "for Mac" suffix in the drive's name will be already formatted for use with a Mac computer. Examples : Free Agent Go for Mac, Backup Plus Slim Portable Drive for Mac. Other family of drives will be versatile and allow you usage on both a Mac and a PC. The "GoFlex" and "Plus" families are such drives. Examples : Backup Plus Desktop, FreeAgent GoFlex Portable. These drives come preloaded with a little driver you need to install to ensure proper usage with the Mac computer. On such drives, locate the MacInstaller.dmg file on the drive and install it to your computer. This will allow you to transfer data to the drive properly.
- Once the drive is ready for use, make sure you can locate it on your computer's desktop.
- Once you can see the drive, open up a Finder window and navigate to where you have the data you wish to drag and drop. If the Finder window opens on top of the drive's icon, move the Finder window around so you can see both your data inside the Finder window, as well as the drive's icon on the desktop.
- Right-click or Command-click the file or folder you want to copy inside the Seagate drive and choose Copy "name of the file or folder you clicked on".
- Open the Seagate drive from its icon on the desktop. Right-click or command-click into an empty area of the drive, and choose Paste Item. Your file or folder will now be copied over inside the Seagate drive.
With either of these two methods, there is no need to use any special software to make use of the drive's storage. You just move your data to it manually, and nothing more needs to be done.
Though any external drive can be used apart from its bundled software, certain Seagate, Maxtor, and Samsung drives are not sold with bundled software. Here is a list of them.
| Drive image | Drive name |
| FreeAgent Go for Mac (this drive is designed to be used with Mac Time Machine) | |
| FreeAgent Desk for Mac (this drive is designed to be used with Mac Time Machine) | |
| Seagate Desktop External drive | |
| Seagate Portable External drive | |
 |
Maxtor Basics |
|
|
FreeAgent Desktop |
  |
Maxtor Personal Storage Family |
 |
Seagate External Drive |
 |
Seagate Portable Drive (most models) |
 |
Seagate Compact Flash Photo drive |
